Microsoft 70-488 Exam Practice Questions (P. 2)
- Full Access (79 questions)
- One Year of Premium Access
- Access to one million comments
- Seamless ChatGPT Integration
- Ability to download PDF files
- Anki Flashcard files for revision
- No Captcha & No AdSense
- Advanced Exam Configuration
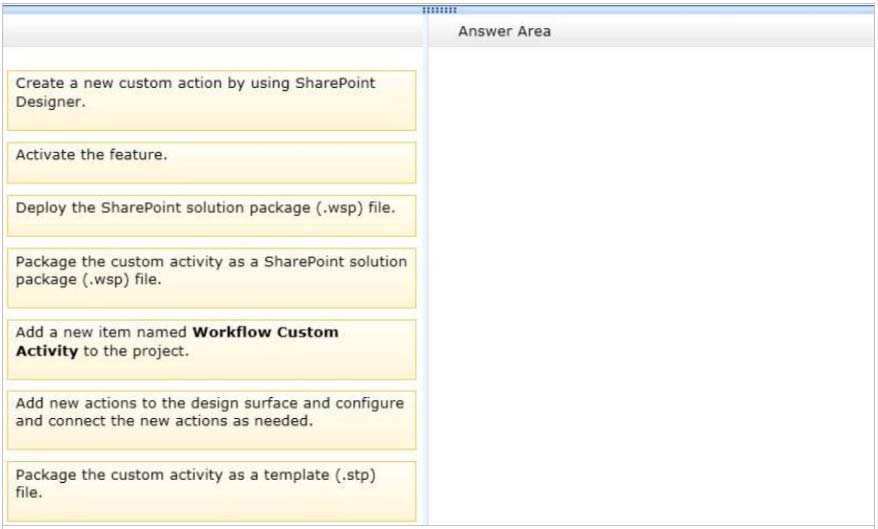
Question #6
DRAG DROP -
You need to create a workflow custom activity to use in a custom action in SharePoint by using Microsoft Visual Studio 2012.
Which five actions should you perform in sequence? (To answer, move the appropriate actions from the list of actions to the answer area and arrange them in the correct order.)
Select and Place:
Correct Answer:
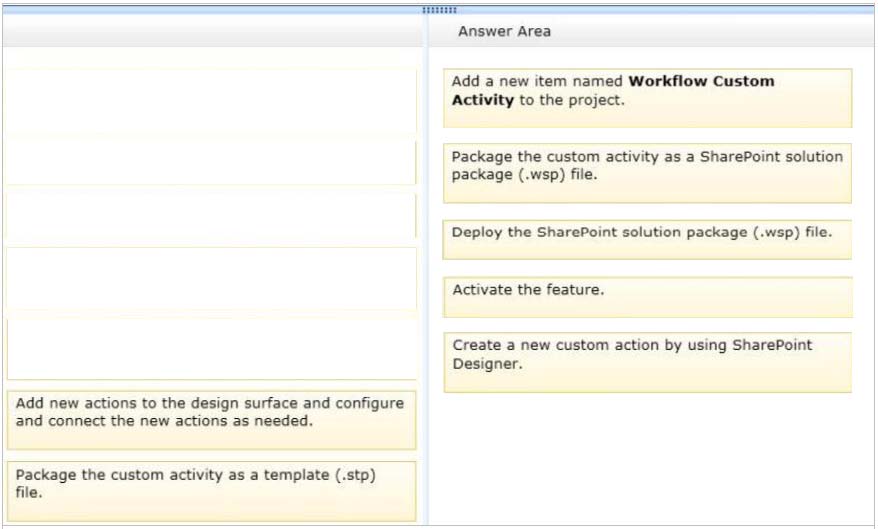
Note:
Box 1 (Visual Studio): Add a new item named Workflow Custom Activity to the project.
Visual Studio 2012 now provides a "workflow custom activity" item type within SharePoint projects. You can use the item type to create a custom activity that you can then import as a custom action in SharePoint Designer 2013.
Box 2 (Visual Studio): Package the custom activity as a SharePoint solution package (.wsp) file.
Custom actions are packaged and deployed as SharePoint Features in SharePoint solution package (.wsp) files
Box 3: (Visual studio) Deploy the SharePoint solution package (.wsp) file.
After you create your custom workflow activity, you can then package and deploy it. After it is deployed, the custom activity can be consumed by SharePoint
Designer 2013 as a custom action.
Box 4: Activate the feature -
After a solution package (.wsp) file is uploaded and activated on the target website (that is, the SharePoint site collection), the features that are contained in the package are installed and available for activation. After the custom actions are activated, they are available for use in a workflow.
Box 5: Create a new custom action by using SharePoint Designer.
* SharePoint Designer provides a collection of workflow actions that are available through the Workflow Designer user interface (UI). Although the range of workflow actions that are included in SharePoint Designer) is extensive, it is nevertheless finite. In some cases, you may need to model a business process whose requirements are not met by the existing library of workflow actions that are available in SharePoint Designer. Recognizing that business processes often have specialized requirements, SharePoint 2013 lets you create custom workflow actions. You can develop these custom actions by using Visual Studio, and then package and deploy them to SharePoint. At that point, the custom action becomes available to workflow authors in SharePoint Designer, exactly as if it were among the library of existing actions.
Reference: How to: Build and deploy workflow custom actions
Reference: Exercise: Implement a Custom Workflow Action in Visual Studio
Question #9
A company uses SharePoint for internal collaboration. SharePoint is deployed on a server farm with a single front-end server, a single application server, and a dedicated database server.
You review existing Web Parts that read from and write to SharePoint lists. You find the following code in one of the utility classes and notice memory leaks in the method.
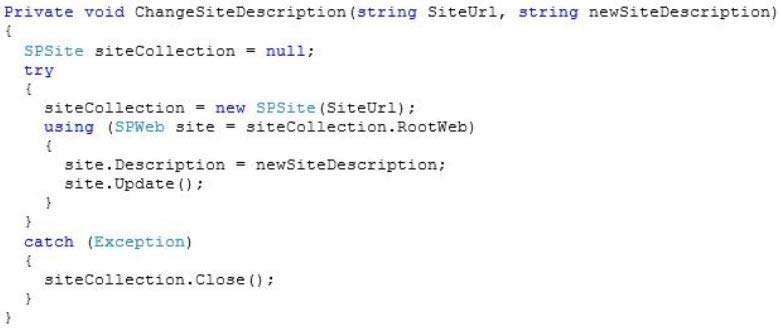
You need to ensure that there are no memory leaks in the method.
What should you do?
You review existing Web Parts that read from and write to SharePoint lists. You find the following code in one of the utility classes and notice memory leaks in the method.
You need to ensure that there are no memory leaks in the method.
What should you do?
Question #10
DRAG DROP -
You troubleshoot the sandbox solutions that your team builds.
You need to redeploy a sandbox solution. You also need to identify which process must be debugged.
Where should you redeploy the solution, and which process should you debug? (To answer, drag the appropriate statements to the correct location or locations in the answer area. Each statement may be used once, more than once, or not at all. You may need to drag the split bar between panes or scroll to view content.)
Select and Place:
Correct Answer:
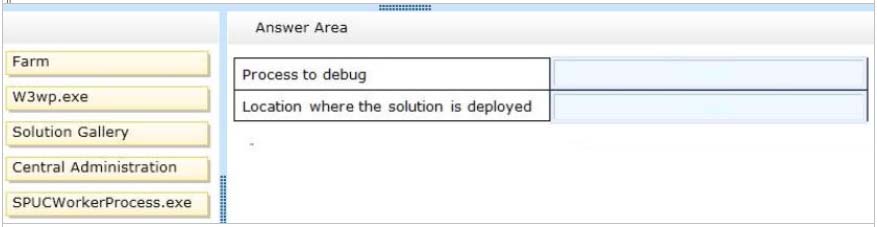
Box 1: SPUCWorkerProcess.exe -
* The Visual Studio debugger usually attaches to the Windows SharePoint Services process (w3wp.exe). If the project type lets you change the Sandboxed
Solution property and its value is set to true, then the debugger attaches to a different process (SPUCWorkerProcess.exe).
* Why Sandboxed Solutions?
In WSS 3.0, solutions could be deployed only to the farm level. This meant that potentially harmful or destabilizing solutions could be deployed that affected the whole Web farm and all of the other site collections and applications that run under it. However, by using sandboxed solutions, you can deploy your solutions to a subarea of the farm, a specific site collection. To provide additional protection, the solutions assembly is not loaded into the main IIS process (w3wp.exe). Instead, it is loaded into a separate process (SPUCWorkerProcess.exe). This process is monitored and implements quotas and throttling to protect the farm from sandboxed solutions that perform harmful activities, such as running tight loops that consume CPU cycles.
Box 2: Solution Gallery -
The solution gallery is a document library stored in the root Web of the SharePoint site. The solution gallery replaces site templates and supports solution packages. When a SharePoint solution package (.wsp) file is uploaded, it is processed as a sandboxed solution.
Reference: Debugging SharePoint Solutions; Sandboxed Solution Considerations
All Pages